It's been a while since I've had time to do any craft style samples but I can never pass-up the chance to make some Christmas ones, so here they are, they are from the cut and create range, which over the years has built up to include a large range of characters.
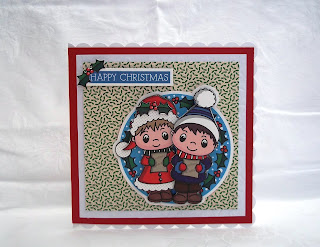
The first one is made on a large card base with scalloped edge. I have layered a piece of red card, a piece of embossed white card with holly pattern and a backing paper of tiny holly pattern.
I have used all the topper of the carol singing children. Except on holly sprig which a saved to attach to the sentiment. The toppers are such a good size you really don't need to add much else to them to easily create lovely cards.
Here you can see the depth which can be achieved by using the whole topper, however it also shows how many layers there are in a full topper. The designs of them also lend themselves to being split up to make two of three cards out of one sheet if you want to.
I caught a glimpse of this card on the Craft with Style show on Create and Craft yesterday (Sunday) you can catch up with the show for 7 days here
The next card is a smaller scalloped edged base. This one was pre embossed with stars so I decided to keep it as the card background and just add a few peel-off gold stars.
With this card I was playing with how these lovely chunky characters can lend themselves to being creative and maybe abit quirky. I didn't use the full topper just added some layers to the head and extra bits for the arms.
I cut the arms off one of the drummer characters and then reattached them with split pins with the arm behind the body and an extra shoulder piece in front of it to neaten it up. I attached strings to the arms and carefully positioned them between the foam pads which are holding the character to the card base. If you look between the two pictures you can see how his arms move when the strings are gently pulled. Like an old fashioned puppet.
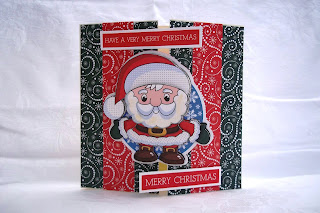
For my next card I took a gate fold base and covered the two fronts with a swirly green backing paper and added strips of matching pattern in red. This is a really lovely backing paper pattern and its lovely how all the different backing papers which are sold with the toppers co-ordinate making it really easy. To the fronts I added two sentiments one at the top on one side and one at the bottom on the other. And the middle is finished off with the Santa character. The photo doesn't show it very well but I've added glitter to his beard.These characters really lend themselves to this sort of embellishment.
The last sample I made was a double easel card which really showcases the toppers and shoes that you don't have to just make cards with them you could easily use them for creating home decor items which children will love to look at. Here a miss Christmas and Snowman are used and the stoppers have been made out of strips from a striped backing paper which is idea for using in the ribbon strips getting lots out of it and really value for money.
After watching the show I now realize how it goes and that I was looking at it upside down. It makes this rather fun pyramid card which if the sides are joined together with velcro dots (I believe supplied with them when purchased) they still fold flat for posting. This shape would make some really fun Christmas cards as it is perfect to be a Christmas tree.
So there are my latest samples, Christmas already. I'm not quite ready to start me own Christmas card making thou, maybe in August.


